
In my last post I had cut all the pieces for the bench to their final dimensions – minus the end pieces which I intentionally left long. Today it’s time to begin cutting some of the joinery for this little bench. The first task was to cut a groove in the front rail and back half of the bench top that will receive the tenons from the side of the wagon vise block.
The grooves are 3/8″ deep and 1/2″ wide and must be centered in the stock. I decided to use my Whiteside 1/2″ downcut spiral carbide router bit for these grooves. Normally I would do this operation on the table saw, but since the grooves are stopped there will be much less to clean up using the router. After setting the bit height to 3/8″ I had to set the fence to ensure that the groove would be in the middle of the piece. Since the thickness of the entire bench is 1 5/8″ I set my dial calipers to 9/16″ and locked the measurement down. Using the shoulder on the end of the calipers provided a nice visual reference against the edge of the bit for setting the fence. With the fence locked down I checked all the measurements again.

The grooves are different lengths on the two pieces. On the rear of the bench top the groove is 7″ long. On the front rail the groove is 8″ long to account for the 1″ that will end up in the bridle joint at the corner. I measured those two distances off from the edge of the router bit – the right edge – and marked them on the aux fence. If this distance is too short it’s no big deal because it will get cleaned up with a chisel later. However, if it’s too long it will show.
After cutting a test piece I measured the thickness of the wood remaining on either side of the groove to confirm that the groove was centered. Normally I would just flip the piece around and run it through the other way to ensure the groove was centered, but since the groove is stopped I decided to leave it at one pass. I also wanted to make sure that the groove remained precisely 1/2″ wide.
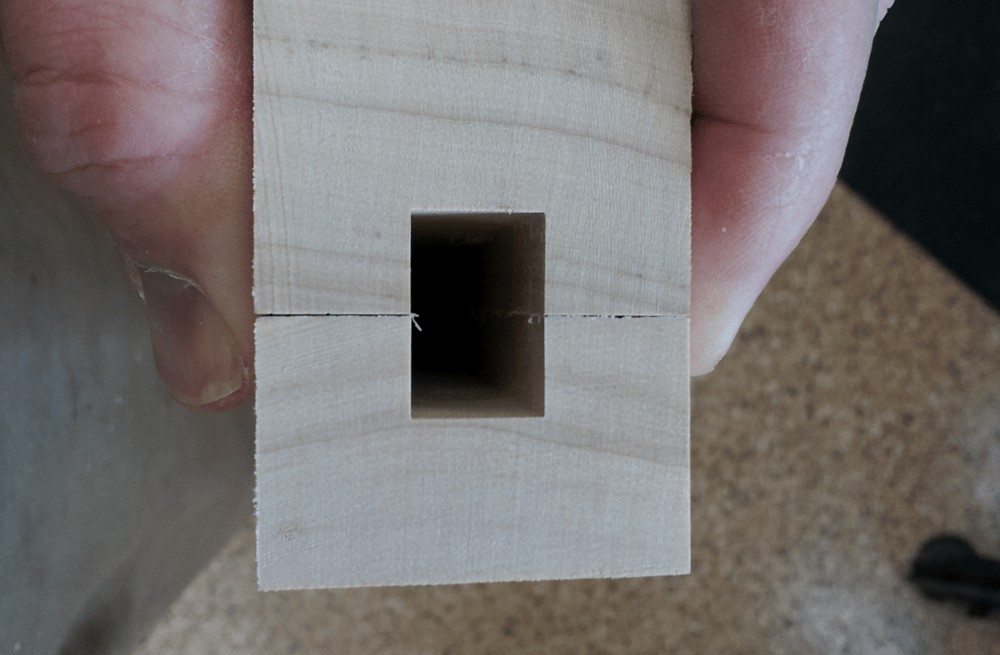
After cutting the grooves in the bench top and the front rail, I sandwiched them together to make sure the grooves actually lined up and weren’t offset.
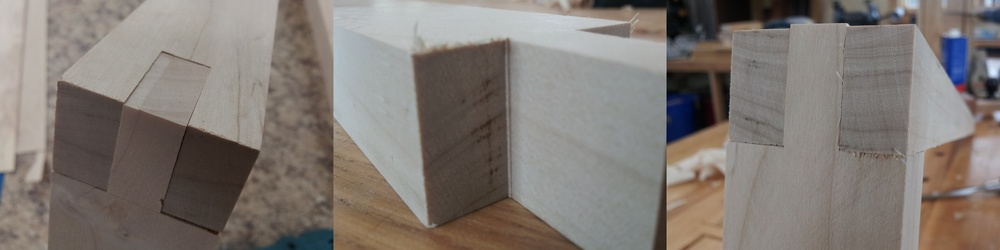
With the the grooves milled. It’s time to move on to the half-laps. I decided to use my tenoning jig to make the half-laps. I’ve had that jig for 15 years and I think I may have used it three times. I normally cut my tenons on the table saw using a dado stack, but with these half-laps only being 1″ long the tenoning jig would make the setup much quicker. I used one of the front rails with the groove in it to set up the jig spacing and height. Since both the front rail and the end pieces are 1″ wide it made setup very quick.
First I cut the dado out of the front rail. Making it 1/2″ wide to match the groove made the setup easier. As Chris mentions in the article, make sure you put the dado in the front rail otherwise the groove will show through the end when the joint is complete.

After making the two cheek cuts I on the test piece I lined the pieces up to make sure the depth of cut was right. In the photo above you can just see the top of the cuts. I removed the waste with my bow saw and cleaned up the remaining debris with a chisel.

Making the mating parts was very straightforward. I used the front rail as a guide to set up the cut for the proper width. The depth was already set since the pieces are the same width.
After a few test cuts on the scrap I had dialed it in for a nice friction fit. After the final cuts I fit the pieces together and they fit perfectly except for a small gap at the bottom.
When I took them apart I found that there was a tiny shoulder in the corner of the joint. This is where hand tools have significantly increased the quality of my work. If I was to attempt to fix this at the table saw I would probably over-correct and end up with a saw kerf that would show on the outside of the joint, but with just a little chisel work this tiny shoulder can be cleaned up in no time and you are rewarded with a very nice fitting joint.
With the half lap joints complete I decided to drill the holes in the front rail for the wood screws. These holes are 1 1/8″ diameter and spaced according to the plan. I drilled them at the drill press with a forstner bit.

After drilling the holes I chamfered the edges of the hole on both sides with a router bit. Much of the chamfer will be destroyed when I thread the hole, I’m sure, but what remains will make a nice transition and reduce the chances of the corner getting chipped.

Well, that’s if for today. Next I’ll glue up the bench top, thread the holes in the front rail and cut the tenons on the wagon vise.

