
In my last post I had just decided to order the Oneida Air Pro 1500. Business must be good for Oneida Air Systems because the dust collector was back ordered for about a month. That worked out just fine because it gave me plenty of time to get the ductwork and install it.
Deciding on the Pipe
After more research I decided to go with 26ga spiral pipe as opposed to the snap-lock. Here are my Pros and Cons for each:
Spiral: The spiral pipe has a smooth interior and slips over the fittings. The spiral pipe comes in 10’ lengths, which means less joints and supports for longer runs. It is easily cut to length and the spiral rib joint makes it much stronger than the same gauge of snap-lock pipe. However, because it is sold in 10’ lengths the cost to ship it can be prohibitive. If you need to join pieces of pipe together you will need a pipe fitting, which is just a smaller piece of pipe with a rib around the middle that’s made to slide into the pipe.
Snap-lock: This pipe is normally sold in shorter lengths. I’ve seen it available in 4’ and 5’ lengths in 24ga and 26ga. The shorter length plus the fact that they can ship it flat means that shipping costs can be reduced. Snap-lock pipe also has a smooth interior with the exception of the seam where the pipe snaps together. However, with Snap-lock one end of the pipe is crimped so that it will slide into another section of pipe. The crimped section will have to be cut off to fit onto a fitting. In addition, if you are as concerned about an airtight system as I am, you will want to tape all the snap-lock seams as well.
After comparing the 24ga and 26ga spiral pipe I found the difference to be negligible for my application purposes. The 26ga spiral is plenty strong for any non-industrial woodworking dust collection system given the relatively small diameters of the pipe we use (see table at right). If you go with snap-lock you will need to step up to 24ga pipe. Oneida-Air, Penn State, Air Handling Systems and Spiral Manufacturing all carry only 24-gauge spiral pipe. Many firms that sell duct for dust collection systems have been pushing 24ga pipe because they generally deal with larger diameters than are used in smaller woodworking shops. However, the engineering data reveals that for anything 8” and smaller there is no advantage to using 24ga spiral over 26ga spiral. If your system is capable of pulling more than 30” of negative pressure through an eight-inch pipe then maybe you want to look at 24 gauge pipe instead. Mine won’t come anywhere close to that.
Another helpful factor is that 26-gauge pipe is frequently used in the HVAC industry so your odds of finding it available locally are significantly greater than looking for the 24-gauge stuff. During my planning I discovered that Phoenix Metals was located right here in Baltimore. Having a manufacturer/distributor within driving distance meant that I didn’t have to pay to ship the spiral pipe, which made the decision much easier. If you are interested in spiral pipe make sure you check with your local HVAC distributers. I found two in my area who stocked 26ga spiral pipe.
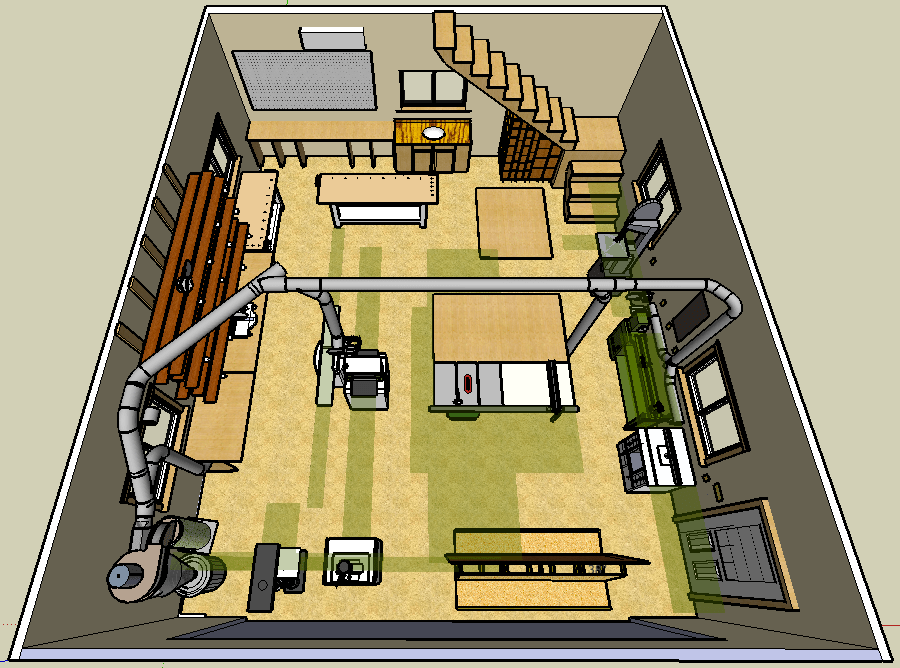
Planning the System
After I had decided on which pipe I was going with I had to come up with a parts list. I’m a big fan of SketchUp for my project planning and this one was no different. I started by building some pipe and fittings in SketchUp to use for planning. They’re not perfect, but more than adequate for planning your system. I uploaded them to the 3D Warehouse. You can find them here.
When I built my shop I planned on adding this system so I tried to think about an efficient duct layout along with an efficient workflow. My duct layout ended up being simple enough that I didn’t feel like I needed to pay someone to do a duct plan. My dust collector has a 7” opening, so that pretty much drove a 7” main line. I knew I wanted a 6” line running to my table saw, jointer and sliding compound miter saw (SCMS). I’m using a lunchbox planer that has a 4” port on it that can’t be easily changed. Here’s what I ended up with.
All of the duct design services that I’ve looked at seem to focus on having more than one machine running at a time. Therefore they reduce the diameter of the duct in order to keep the velocity up in the duct with two or more machines running at once. In my shop, however, there is no requirement for more than one machine with an open blast gate at any given time. Of the “big three” machines, my table saw is the farthest from the dust collector and I knew I wanted a 6” line running to that. After that my main line reduces to 5” and then 4” where it splits to my floor sweep, band saw and router table.
As part of this system I wanted to improve the dust collection of my SCMS too. I had built a hood with curtains a few years ago and it did a pretty good job of capturing the majority of the dust, but having a central system afforded me the opportunity to improve on that too.
I build a tapered box with a 6” blast gate to go beneath the bench that the SCMS is on and then I cut a tapered hole behind the saw through the top into the tapered box. I think it’s safe to say that this setup is grabbing > 99% of the dust from the SCMS now.

Installation
With the ductwork in the shop I started the install. It went pretty quickly with a spare set of hands to help hold things in place. I bought a $36 pneumatic rivet gun from Harbor Freight that works like a champ and saved a lot of time. I also discovered that using a jigsaw was the easiest and fastest way to cut the pipe (more on that later).
I started assembly with the two lateral T’s over my jointer and planer because their position drove the location of everything else. I lined up the parts, drilled a hole and then put a rivet in it. For all the riveted joints I tried to get rivets at 12 o’clock, 4 o’clock and 8 o’clock so as to avoid any protrusions on the bottom of the pipe where the debris was most likely to travel. I used 3/16” diameter by 1/8” length rivets.
Let’s talk about tape. I have used a variety of duct tape in the shop over the years. Some of the stuff has lasted quite a while and some has dried up fallen off a few years later. Since I do not plan on re-doing this job any time soon I wanted to make sure that the tape I used would last. I asked several of the spiral manufacturers what they recommend and I got a fairly unanimous response. Polyken 367-17 Foilmastic.

This stuff is not easy to find, but it’s worth the search. I got mine from a local HVAC supplier, but I’ve also seen it on Amazon.com. The main difference between this tape and most other tape you will find is that it is a foil tape with a rubber liner and a butyl rubber adhesive. What this boils down to is that it is 100% airtight, has a tenacious grip and removes with no residue. It’s great stuff. It comes in a three-inch wide roll and it’s 17 mils thick! I actually found that this stuff grips so strongly and seals so well that I really didn’t need to rivet any of the joints that weren’t loadbearing. I probably didn’t even need to rivet the loadbearing ones but I did just for peace of mind. This tape does not stretch to cover out-of-plane surfaces. However, it you rub over the wrinkles – even large ones – with a smooth piece of plastic they will seal up completely. I used the back end of my utility knife.
After I got the main trunk line run I finished the drops to my machines just in time for the freight truck to deliver the cyclone. It was BIG and HEAVY.

After I got it all unpacked it wasn’t so bad. The main issue was figuring out how to get it all together without an army of strong backs. Oneida gives you three different methods to assemble it, but they don’t tell you how to lift all this stuff to get it in place. It took a bit of work, but we finally got in all done.
The filter plenum and dustpan were back ordered so it took an extra two weeks for them to arrive, but it was worth the wait. Oneida said that the parts shortage was unforeseen so they had upgraded me to metal components from the normal plastic composite stuff. I really like the metal dustpan because it is so much easier to remove that the original setup with the J-hooks. I hope they move to this setup as a standard feature because it is much nicer.

I’ve only had the dust collector running for a few weeks now but I’ve had to empty the bin twice already, so it’s getting some good use. I love having the Dust Sentry to tell me when it’s full. It works like a charm. So far I’m very happy with the performance. I have also noticed a nice bump in productivity since I don’t have to move the dust collector from machine to machine for each operation.
Noise
The noise is about what I expected, but with the remote control I can turn it on and off as needed. Plus, it’s much quieter than any piece of equipment I’m using it to collect dust from except maybe the band saw. Oneida’s literature claims that it is 82db at 10’ and sure enough, that’s exactly what I measured. My old 1hp roll around measures 80db at 4’, which is about how far it normally was from me while it was operating. Here are the sound levels for my equipment while it’s operating. The 1st # is just the machine running and the 2nd # is the machine in use: Planer 91db/103db, Jointer 85db/105db, Table Saw 83db/93db. As you can see, my machines are much noisier than the cyclone.
Researching this system, deciding on ducting, installing the ducting, and building the system has been quite a journey. Hopefully some of my research and rationale will be of use to you in the future.
If you have any questions or comments, please don’t hesitate to post them below.

Thanks for posting this — it is really helpful as I'm similarly designing a DC system and have also been thinking about Oneida. I was surprised though that you reduced your pipe dimension so far from the equipment. My planning has been to run full diameter (in my case, 6") right up to the point of connection to the machine, and then reduce. The theory behind this is that the airflow decreases with the diameter reduction, so I'll get better flow through the length of duct work by keeping the diameter large. What have you found on this?
LikeLike
Thanks for reading Carl. You can do it that way, but it really won't make any difference with the distance we're taling about here. The total CFM will be reduced when you drop to 4", but that restriction is so low in my system that it really makes no difference and I didn't want to give up the additional 2" that my equipment would have to be from the wall. The Oneida rep computed less than 5" of static pressure at the end of the 4" section*. I left the 6" section for everything with a 6" port, but after that there really wasn't much benefit to carrying the 6" line all the way down the wall. It certainly won't hurt, but any gains will really be negligible. It's a case of "measure it with a micrometer, mark it with a pencil, cut it with an axe."I have a tremendous amount of airflow through all three of my 4" ports.*Oneida actually started planning my system before I decided against using their service, but they were nice enough to give me a copy of the little bit they had worked up.Cheers,Mark
LikeLike
I am contemplating a cyclone system for a similar sized shop. Your thought process is very helpful in assisting me with my decision. I would like to know why you ruled out PVC for the ducting? I know I would have to ensure it is grounded but unless there is a performance factor I am not aware of I will consider using it. My shop is in my basement and I am also concerned about limiting noise. I have read posts that indicate that pic ducting can dampen some of the noise. Any thoughts?
ThanksDan
LikeLike
Hi Dan, I did not go with PVC for a couple of reasons. One was cost. PVC starts rapidly exceed the cost of 26ga spiral pipe above 4" diameters. Secondly, the selection of fittings specific for dust collection (like long radius elbows and long tapers) is virtually non-existent. Using traditional PVC short radius elbows and tapers significantly reduces the efficiency of the system.As for noise dampening – unless you are putting your cyclone in a different room nothing will exceed the noise of the collector. I have never really noticed any noise at all from the actual ducts other than the rare occasion that I suck of a small chunk of wood. Then I hear it rattle through the duct on it’s way to the collector, but I don’t mind that at all.The biggest thing I did to reduce noise was to seal the the bottoms of the blast gates that are left open to make them "self cleaning". I’ve never had an issue with that because there is never anything left in the duct to begin with. Another nuance is making sure the blast gates are installed in the proper direction so that the thumb screw used to hold them in position is not holding the gate "cracked" and letting are in creating a whistle.I hope this helps you with your decision.
Cheers,Mark
LikeLike