
Last year when I took a Boggs chairmaking class with Jeff Lefkowitz (which I highly recommend) I spent quite few hours using a drawknife and spokeshave on a shaving horse. While I thoroughly enjoyed the shaving experience my rear end did not. Due to the fact that my job requires me to sit for hours on end the idea of sitting the whole time while shaving did not appeal to me. So, I began brainstorming on a way to make a shaving contraption that could be used standing or sitting. My goal was to have a device that could be secured to my bench using a standard vise or holdfast, was easy to store and inexpensive to construct.
I started by thinking about ways to secure the work. It had to be something that could be clamped and released very quickly and easily due to the pace with which you move the work while shaving. At first I was thinking about a pneumatic hold-down clamp with a pedal, but dialing in the right pressure for the piece proved to be frustrating and I was already violating my principal of economy. After several different iterations I ended up scrapping that idea and I started to move back to the traditional leverage clamp system employed by a shaving horse.
Creating the leverage system was pretty straightforward. Getting the geometry right for proper ergonomics took a little more thought. In order for the device to work both standing and sitting I needed to establish the height range at which the work would need to be held. I measured the height of my navel both standing and sitting to determine that range. Then I measured the distance from the work that my navel would be to shave comfortably. Incorporating the height of my bench into the equation gave me an angle of 26 degrees. Armed with that number I had to determine how to make a head that was easy to adjust but that would also take the pressure of holding the work. What I finally settled on was a 5/16″ bolt which runs up though a t-nut which is captured in the middle of the head and topped with a brass acorn nut.
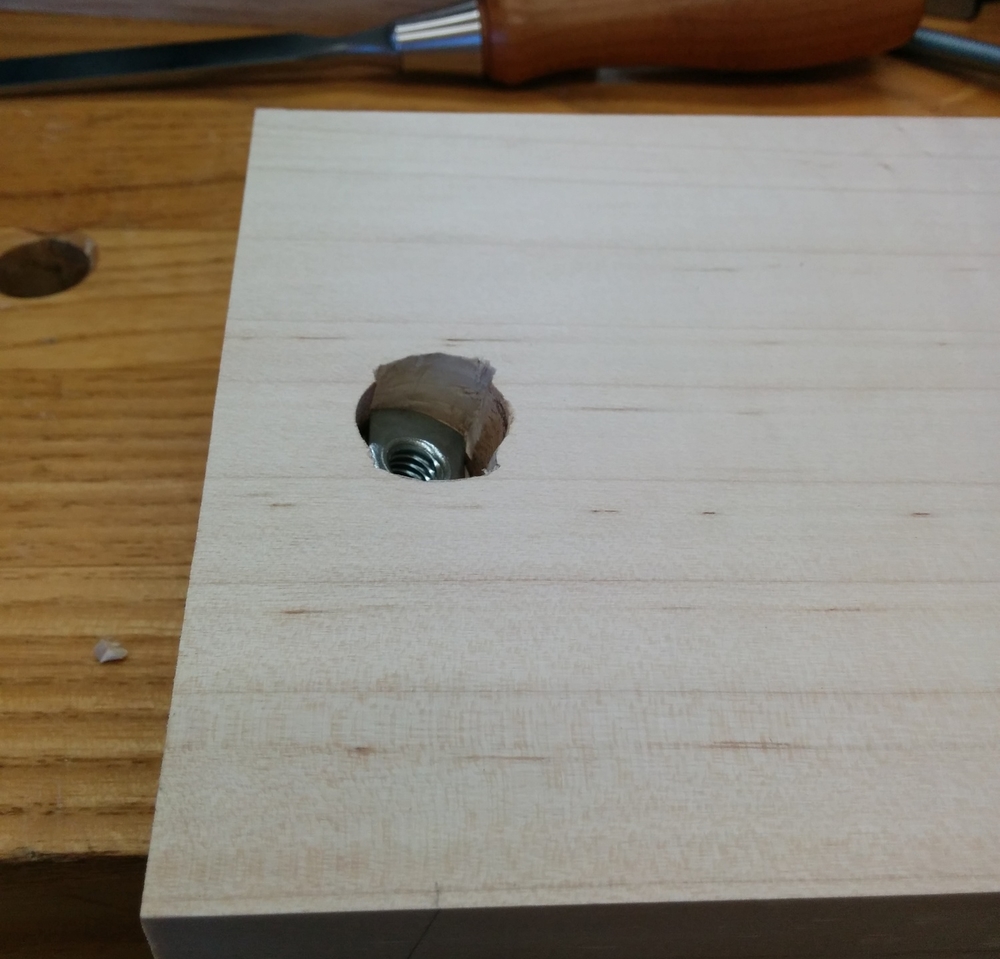 Here you can see the detail of the sliding T-nut installation. The holes are drilled 13 degrees from vertical so that the adjuster is perpendicular to the support block when it is level. I drilled three holes to install this: 1st=diameter of acorn nut and deep enough so that it can recede into the board, 2nd diameter of the barrel of the t-nut and deep enough for the whole barrel, 3rd the 5/16″ hole all the way through for the bolt.
The bottom of the head is angled 13 degrees on each side to allow it to adjust for the full 26 degree range of motion I was after. This proved to be very easy and inexpensive to construct while allowing the user to quickly dial in the proper angle for the work being performed.
If you have ever done any work on a shaving horse then you know that thickness of the work can vary quite a bit and change quickly as you shave away the waste. For this reason the distance that you have to press on the pedal can also change quite a bit leading to periods when you feel like you are too close to the work or too far from it. In order to address this I drilled the hole in the clamp bar eccentrically to that the distance from the pin to the surface is different on all four faces. This gives a total of a 1/2″ (increasing 1/8″ for each face) difference in distance available from the clamp bar to the work support. This variable distance allows you to adjust to the diameter of the workpiece without having to vary your body geometry much.
 The eccentric hole allows fine tuning of the position of the clamping block and therefor the position of the pedal.
My plan was to construct the uprights using 1″ square tubular steel and my newly acquired welding ability.
At this point in my design process I stumbled upon the “Shaving Pony“. As they say, there is nothing new in woodworking, and this just proves it to me once again. The Shaving Pony was very similar to the design I had come up with. Seeing their version served to reinforce my design ideas, but showed me that I could just use two boards for the uprights and avoid the welding. Perfect!
Initially I had the pedal resting on floor but I found it too difficult to release the pressure of the clamp. To address this I installed a pair of roller blade wheels on the end of the pedal. The roller blade wheels have a 1/4″ axle so they work perfectly with a 1/4-20 bolt threaded into a threaded brass insert. The wheels dramatically changed the feel of using the Shaving Post. With the wheels installed applying clamping pressure became a much gentler and more precise movement and release of that pressure was instant and intuitive.
I constructed the Shaving Post from less than 10bf of 4/4 hard maple at a cost of $40. The hardware checked in at last than $10. I used 1/2″ bolts too, which are complete overkill, but I didn’t have a 1/4″ or 5/16″ core box router bit on hand so I bought the bolts to match the bit I had. Having said that, you could easily use a straight bit of the proper diameter, an extra long drill bit or a table saw to mill the dados for the bolts to pass through. Just make sure you can find the smaller diameter bolts in the lengths you need before you commit.
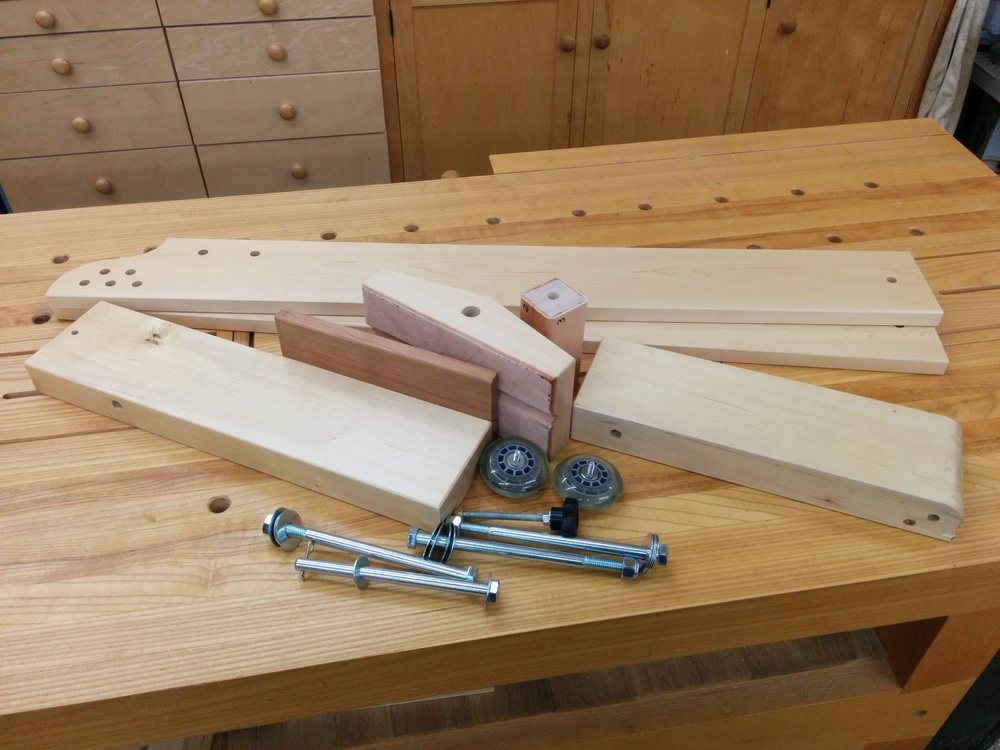 Here is the Shaving Post prior to assembly. It takes only a few minutes to put it together so, as you can see, it can be stored easily when not needed.
I made working width 5″ which is why I didn’t try to drill through 5″ of hard maple (well, actually I did, but that will have to wait for another post during Safety Week). I milled the groove and the laminated the boards together to create the captured groove.
I also used 8″ bolts to ensure that all of the wood surfaces riding on the bolt were riding on an unthreaded portion of the bolt. This has left me with about 5/8″ of thread protruding from the nuts. I might cut that off, we’ll see.
i wanted the clamp bar to be able to be moved from one set of holes to another easily and tool free. So, for that I used a 10″ bolt, cut off the threads and drilled a hole in it to receive a hitch pin.
 Here is the Shaving Post head assembled. The leather addition enables you to clamp a workpiece much more securely with significantly less pressure.
I’m quite happy with the function of the Shaving Post. It has actually exceeded my expectations for ease and comfort of use. I plan to put it to good use very soon as I begin to build two more Boggs chairs.
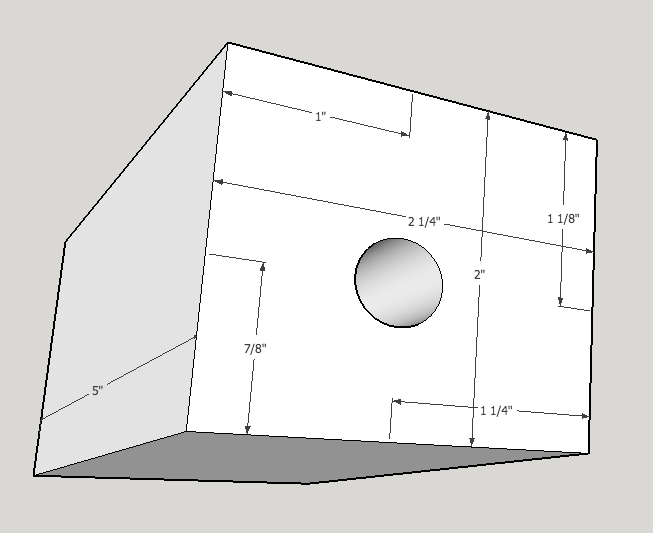
If you are interested in building one for your own use, here is a SketchUp drawing available to download. Trimble now calls the free version of SketchUp, SketchUp Make.
I am distributing it with the same license as all of the content on my site which you can find by clicking on the CC icon in the bottom left corner of any page on my site. That license is Creative Commons Attribution-NonCommercial-ShareAlike.
 Here you can see that the hole in the support block needs to be oversized (mine is 3/4″). The top of the hole in the support block needs to be even with the top of the hole in the upright in order to allow for the increase in distance between the pivot point and bolt than runs thought the support block as the uprights are moved from vertical.
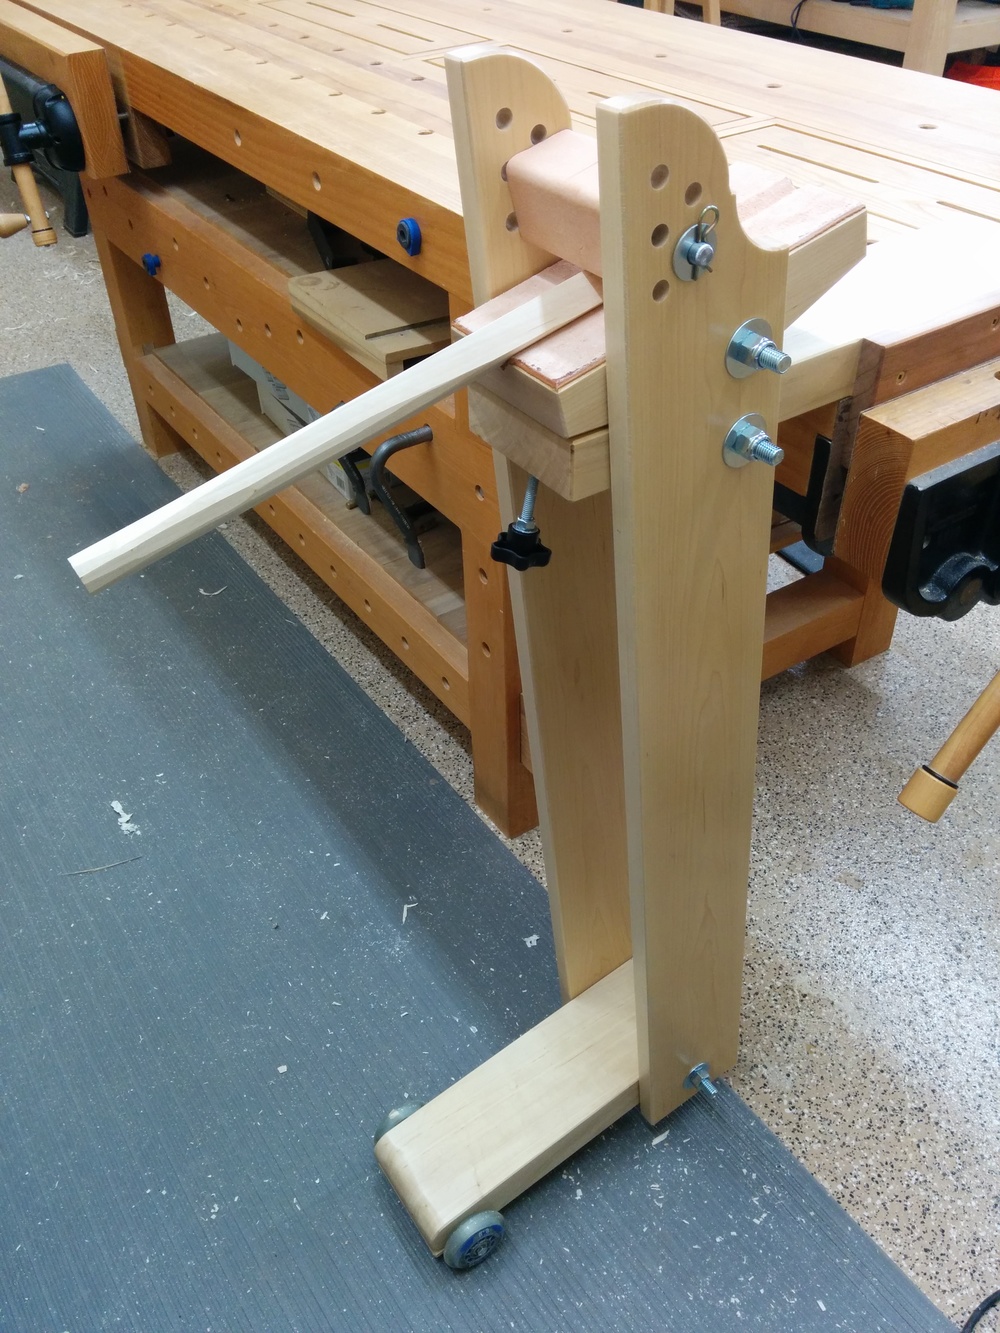 Here is the Shaving Post fully assembled. The mounting options are endless. Here it is mounted in my end vise, but with very little modification it could be mounted perpendicular to the vise or just clamped to a bench top with holdfasts.
If there is enough interest I’ll do another post about the construction details, otherwise I’ll just use my time in the shop.

This is the nicest design (and execution) for a Shaving Pony I’ve seen. The flexibility you’ve built into it is fantastic. I am definitely making one.
I downloaded the SketchUp drawing but you need the Pro version to open it. Would it be possible to post a copy of the drawing that you can open in SketchUp 8?
Thanks for the great postJamie
LikeLike
Thanks for the kind words Jamie. The SketchUp file was indeed created with SketchUp 2014, but not the Pro version. SketchUp is always free for hobbyist use. Just go to the SketchUp site and download the latest version. After installation it will enable Pro features for limited time trial period and then it will revert to the standard free version. When you get the splash screen on launch just click the little button in the lower right corner of the splash screen to continue with the free version.
LikeLike
Just to be clear, the free version of SketchUp is now called SketchUp Make. If you click on the "Products" menu on their home page you will see it listed.
LikeLike
I liked your design so much, that I built my own shave pony. Mine isn’t as fancy as yours in that I used 2 x 6 construction grade pine from Home Depot. I used 3M 370 anti-skid instead of leather. Thanks for coming up with the design and for posting pictures and plans. Thanks again. Don Loveless, Jr., Tulsa, OK.
LikeLike
Hello Mark, I would really like to build your shave pony but I am computer illiterate. Tried to down load the plans to no avail. Any help would be greatly appreciated. Thanks Nick
LikeLike
See if the link works now.
LikeLike
Hi Mark. I cant seem to get the link for the shave pony drawings to work. Can you send it to me…thanks
Kerry
LikeLike
Try the link now.
LikeLike
Thanks for that great design. The link to the download doesn’t work anymore though. Any chance you can update it?
Thanks
LikeLike
Try it now Tom.
LikeLike
It works! Thanks so much ! I just need to get to it now I guess 🙂
LikeLike
Hi, this shaving horse looks amazing! I’d really love more details but the sketch up file link seems to be dead. Can you update it? Thanks!!
LikeLike
I updated it. Let me know if you’re able to download it now.
LikeLike