
With construction of the table base complete…

it was time to paint it the requisite color – a brick red.

It’s time to make the top. As you saw in my previous post I am going to make the top from three wide cherry boards. The boards were sawn by a local sawyer with a Woodmizer bandsaw sawmill. Most of the cuts are nice and smooth, but the cut between two of these boards was very wavy. That is going to lead to a lot of cleanup work. The boards range in width from 15″ to 12″. Since my jointer is only 8″ wide I needed to find a way to flatten one side of the boards before I run it through my 15″ planer. There are several options here. I could 1) remove the guard from my jointer and joint one face creating a really wide rabbet and then put a piece of plywood under the rabbet and run it through the planer to flatten the opposite side 2) Make a long sled out of plywood or MDF, shim the board so that it wouldn’t rock or flex and then run it through the planer to flatten one side 3) Use hand planes and flatten one face by hand before flipping it to run though the planer. I chose door #3. I’ve used both of the previous methods before and they work pretty well, but if something goes wrong sometimes you won’t know it until it’s too late and I didn’t want to take that chance with these boards. So hand tools it is. This is when it’s really nice to have hand tools skils, even in a power tool shop. Let’s hear it for “hybrid” woodworkers!
I started out by laying the board out on my bench and shimming it so that it will not flex as I plane it. Then I got out my trusty winding sticks (two pieces of alluminum angle, one of which is painted black) to see how much work I have to do.
I have to stop here for a second to talk about my favorite hand plane – my Lie-Nielsen #62 Low Angle Jack Plane. This plane is the core of my flattening aresenal. Because it is a bevel-up plane it can quickly switch roles from an aggressive truing plane to a normal jack plane to a high angle smoothing plane. I have two normal blades, one is ground and sharpened with a two degree micro-bevel to 47 degrees (plus the 12 degree bedding angle of the plane yields a tear-out free 59 degreee cutting angle) and the other at 32 degrees for a more conventional 44 degree angle. I also have the toothed blade which is the master of tear-out free stock removal. This is the most versatile plane I own and it would be the last to leave my shop if I had to sell all my bench planes.
This, along with my Stanley #7, is my stock truing kit.

Ok, back to flattening this board. First I put one winding stick in the middle of the board and the other on the far end. The little green arrow is pointing to the silver winding stick which you can just see the top of.
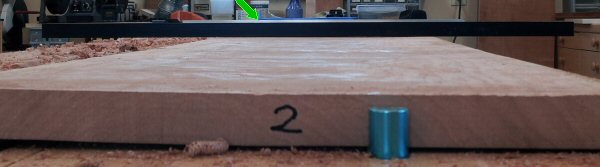
As you can see, the reveal of the silver winding stick is pretty uniform all the way across so I know at least those two points are pretty much in-plane. Next I move the winding sticks to the closer end of the board. The silver one is now in the middle of the board where the black one was previously.

You can see that the left end of the black winding stick is high compared to the silver one, so I know I have to bring that corner of the board down. You can also see that twist evident against the bench – I didn’t need winding sticks to see that!


What I like about the toothed blade in the #62 is that it acts like a bunch of tiny chisels so it doesn’t leave tear-out on curly woods, like this cherry. In the beginning I have the plane set to take a very thick shaving and it may tear-out a bit, but as I continue I back off the blade a bit and it leaves a completely tear-out free surface. I get the added benefit of being able to easily tell where I have planed and where the low spots still are based on the cross-hatch pattern left by the blade.

I went to work planing that corner down and checking the board all the way down with the winding sticks. The result was a board with one surface flat enough to put down and run through the planer.

It took me about 45 minutes of decent effort to get it all flattened, but now the hard part is over.
After I got all three boards thicknessed it was time to work on getting them joined into a table top. Since I don’t have access to a 36″ planer or a wide belt sander I needed to make every effort to get these boards to line up as closely as possible on the show side. I’ve used biscuits before, but they always seem to have a little play in them and never seem to end up getting the boards lined up just right. I’ve also tried to tongue and groove the boards but the edge that I’m cutting the tongue on always seems to suffer some tear-out from the router bit and leaves a poor finished joint as a result. I’ve got three really nice edge jointed boards now so I chose to spline the entire edge – just like the Shakers did on the originals (seen here in a photo I snapped quickly, and illegally I think, yesterday while visiting Canterbury Shaker Village)

I used a 1/4″ slot cutting bit to route a groove down the edge of each board always referencing the show face. Before I was allowed to assemble the boards with splines I had to have my work inspected by a member of my Quality Assurance team. Whew! It passed inspection.

With a 1/4″ groove and a 1/4″ spline there was no wiggle room. I beveled the outside edges of the splines just enough to help them find their way into the grooves when things didn’t line up just right. After everything was glued, clamped and dry I was very happy with how true the boards came out. The biggest difference in the edge of the boards came out at just under 1/64″. I measured it just to be able to quantify it for you – it’s not nothing a scraper won’t take care of in a couple of swipes.
Ok, so now it’s on to the breadboard ends. I found it interesting that the Shakers made some of their breadboard ends on their tables “backwards” from what I planned on doing – they had the tongue on the breadboard end instead of the table end. In fact, here’s a photo of two ends of the same table. Notice anything?


Sorry, that tongue looks a little too small for me. I elected to put a 2″ breadboard end on. I milled a groove down the middle of each end piece at the router table using 1/4″ with bit and stopped the groove 1/2″ from each end. Then I used my mortiser to mill 1/4″ wide mortises 1 5/8″ deep to accept the five tenons. Then I just cleaned up the mortises with a chisel.
I decided to cut the 1 1/2″ tenon using my skew rabbet plane. That way I could fine tune the fit with the end piece.

With the tongue complete I marked out the tenons and then cut out the waste in between them to leave the 1/2″ tongue full width.
My plan was the drawbore the ends on with the 1/4″ walnut pegs I was planning to use.
This is where the wheels began to fall off the cart. After 15 years of woodworking there’s one addage that seems to ring true for me more than all the others – The difference between a good craftsman and a poor one isn’t how much you screw up, it’s how you recover from the screw ups – or words to that effect.
I was really careful about drilling the holes through the ends so that I didn’t get any tearout on the under side. Then I took the ends over to the top, slid them on and used the same 1/4″ brad point bit to mark the center of the holes on the tenons. So far so good. Then I removed the ends put the bit in my hand drill and used the brad point to move the hole out about 1/16″ – just enough to tighten up the ends when I drove the pegs in. I drilled a nice round hole in the center tenon and made progressivly wider holes in the outer tenons. When that was all done I side the breadboard end back on to proudly veiw my nicely offest drawbored holes…in the wrong direction! The holes are supposed to be offest in, not out! I created an un-drawbore! Ugh. (insert a litany of swear words and self-derision here) I broke out in a huge sweat.
Ok, time to sit down and re-group.
I came up with a plan. Since I had only offset the holes about 1/16″, I should be able to bump up the size of the peg to 3/8″, offset the holes properly and still have just under 1/16″ of drawbore. But I didn’t have any walnut scraps that were both thick enough and straight grained enough to make the pegs, so they would have to be cherry. I quickly milled some octagonal sticks just over 3/8″ wide and broke out the trusty dowel plate. A few minutes later I had two feet of 3/8″ cherry dowel.
Now the challenge was how to drill the holes cleanly since the middle of the bit would be drilling into the existing hole. The ends weren’t a problem because I could anchor them down at the drill press, but the tenon would be an issue. I solved that by taking a small scrap of 3/4″ oak and drilling a 3/8″ hole through it, offest the appropriate amount from the edge (CLOSER this time). Then I clamped that scrap to the tenon and used it as a guide. Worked like champ.
After I got the ends on and the pegs driven I let out a huge sigh of relief.

Now that the pegs are in there I think that the 3/8″ pegs are actually more appropriately sized. I think the 1/4″ pegs would have looked diminutive.

Ok, on to the finishing…
Thanks for reading!

Hats off for the beautiful work you are doing. This table is near the top of my bucket list. Fine rendition you’ve done
LikeLike
Thanks Rolling. This was fun project to build and it’s a pleasure to sit down at it every day.
LikeLike
GREAT work, Mark! I think you made the right decision, going with the larger dowel for the drawbore. The table is beautiful!
LikeLike
Thanks Al! That’s one of those "better lucky than good" moments.
LikeLike