
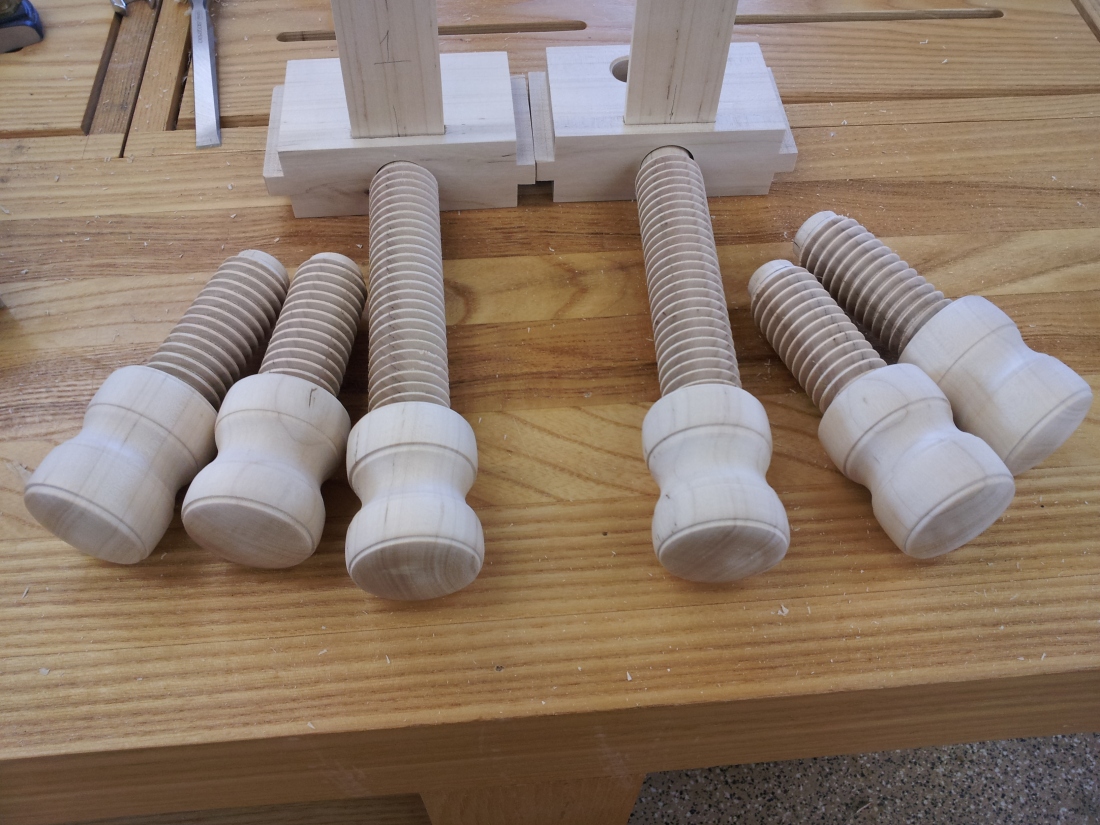
Ok, let’s finish this bench! With the screws completed and handles glued on all I have left to do is actually assemble the bench. I marked out the position of the screws on the end pieces and then drilled countersinks and clearance holes.
The glue-up starts at the end opposite the wagon vise. I glued the end piece on and then set it aside to dry. While that was drying I decided to make the 3/8″ dowels that will reinforce the bridle joints. Making the dowels is a little easier than the large ones for the screws. I made a doweling jig a few years ago which comes in handy anytime I’m making dowel stock. It’s a simply a piece of plywood with two v-grooves milled in it to hold the stock. I ripped some straight stock to 13/32″ square and then laid it in the v-grooves and ran it through the planer. You can use the same jig to hold the pieces and plane them by hand. That’s actually how I initially used this jig.

By flipping the stock 90 degrees after each pass you end up with an octagon perfect for doweling.
Making dowels
To make the dowels I just position my dowel plate over a dog hole in my bench and taper the very end of the dowel just a little so it will go into the hole. After that I just pound away making sure to support the stock with my fist to keep it from breaking. As you can see, the shavings are still course. If you go much over 1/32″ oversized for your dowel stock you will start to run into problems.

By now the glue had set up enough to remove the clamps to continue the glue-up. I applied glue to the half-lap and the spacer block using a second spacer block to make sure the front rail stayed parallel to the bench. Remember to put the vise block in with the proper orientation before gluing the end piece on.
I recommend pre-finishing the vise block and the grooves that it rides in. These are areas that are very difficult to get to after the assembly is complete. In addition, you will definitely want to pre-finish the threaded hole and screw for the wagon vise. The last thing you want is finish getting in there and seizing everything up. Just make sure you don’t get finish on the glue surfaces – like the mortise for the garter on the vise block.
After the glue had dried I drilled pilot holes for the screws using the clearance holes as a guide. In maple, pilots holes are mandatory. One broken screw will quickly teach that lesson. These are just zinc plated steel screws that I stripped. I applied Super Blue to the heads to help keep them from rusting – plus I like the black color.

After pegging the half-laps, the only thing left to do was to complete the assembly of the wagon vise. I applied some bees wax to the tenon of the wagon vise as well as to the inside of the garter. Hopefully that will keep things running smoothly for quite a while.

Works left or right-handed
I made two modifications to the original design in order to make the bench ambidextrous. By using round dog holes instead of the more traditional square ones this bench can be used with either side up, making it work for either left or right-handed craftspeople.
I also increased the size of the hold-downs so that the screws holes could be placed in the middle of the bench allowing them to be flipped easily when changing the configuration.
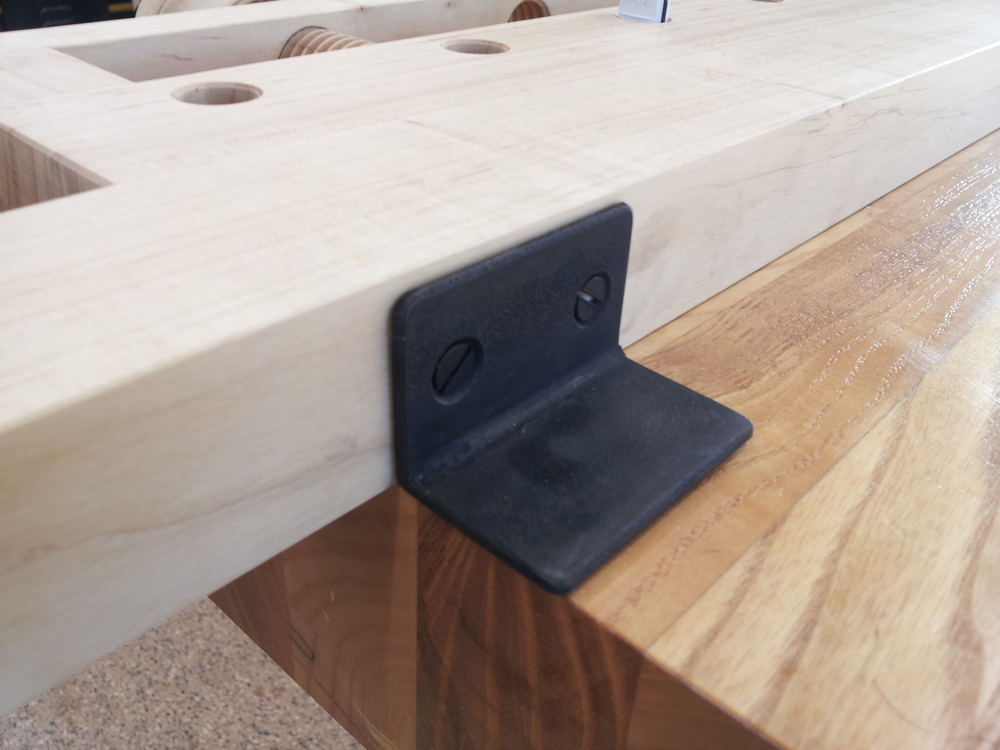
Flippable hold-downs and round bench dogs make a versatile bench


The purpose of this series was to add information to help novice woodworkers build a bench that they can use to help improve their skill level in the craft. With the exception of making the screws with the router powered threader this entire bench can be built using hand tools alone if that is your desire.
Don’t let the fact that I used some machines discourage you from building this bench if you don’t have access to them. You could build this bench with the following hand tools: a rip handsaw, a tenon saw, a set of chisels, a drill (hand or power), a jack plane and a router plane (or powered router). You can order the dowels from Beall Tool and you can make the handles octagonal removing the requirement for a lathe. That’s not a very long list of tools. I guarantee that regardless of how you build this bench you will be a better craftsman for having built it – and you’ll have a great little portable bench to show off and use for years to come.
If you have any questions about techniques I employed here or how to do a certain operation with a hand tool instead of a power tool just ask in the comments below and I’ll be happy to help out.
Thanks for reading!

You did a really wonderful job on these benches, as well as the article. I don’t really have a need for one of these, but you have my interest piqued to the point that I would like to make one just to do it.
Thanks for the time you took to document this.
Pete
LikeLike
Thanks Peter. I hope you do make one. You never know when it will come in handy.
LikeLike
Really great series, Mark! Well written with a lot of excellent information.
LikeLike
Thanks Vic. Hopefully it will help others if they decide to build one.
LikeLike
What is the source of the benchdogs?
LikeLike
Hi Mitchell,I got the bench dogs at Highland Hardware. Here is link to the item: http://www.highlandwoodworking.com/roundaluminumshortbenchdogspair.aspxSimilar ones are also available from Lee Valley: http://www.leevalley.com/US/wood/page.aspx?p=31127&cat=1,41637,41645,31127
LikeLike
Hi Mark,
Thanks for the series! I’m beginning at woodworking and, lacking a decent workbench (and the space for a large one), I’m planning to build one of these as my first serious project 🙂
One question: why do you (and Chris Schwarz) make the tail vise off-centre, instead of centred as in http://www.popularwoodworking.com/workbenches/schwarz-workbenches/the-modern-milkmans-workbench ? Is there any particular advantage to this design?
Thanks! 🙂
LikeLike
Hi Rodrigo,By off-center I suppose you mean that the dog hole are not centered in the vise block, is that right? There are two things going on here. First, on Chris’s version of the bench he used square dog holes which were made my cutting angled dados in the the main block and then laminating a piece over the dados to create the dog holes. This approach necessitates keeping the dog holes close to the front edge of the bench top. He then centers the screw behind the dog hole in the vise block – even though they are not centered in the vise block.On my bench I used round dog holes and drilled them a comfortable distance away from the front of the bench. I too lined the dog hole in the vise block up with the dog holes in the bench, but my vise screw is offset a bit from the dog hole. This causes the vise block to wrack just a bit when tension is applied, but the tolerances are tight enough that there is no binding or anything.So, the key thing is that the vise dog holes are lined up with each other. where the vise screw comes in isn’t critical as long as the fit of your vise block is close enough to keep it from binding.Thanks for checking. Send pictures when you start working on yours.
Cheers,Mark
LikeLike
Hi Mark,
Thanks for your quick reply! And for the thorough explanation, as a newbie I’ve found that very helpful. However, it wasn’t really what I had meant 🙂
What I meant was: if you are standing by the bench, facing the face vise screws, the whole tail vise block is closer to the edge that’s closest to you than to the opposite one. Or, to put it another way, if you stand by the end of the bench so that you are facing the tail vise, this is what you will see:
|[–]|||
In which | is the left edge, [–] is the vise block, and ||| is the (wider) right edge. See what I mean? I was wondering why the bench would be built like this, as opposed to centering the tail vise block like this:
||[–]||
which is what the picture here shows: http://www.popularwoodworking.com/workbenches/schwarz-workbenches/the-modern-milkmans-workbench
Is that clearer?
Thanks again! I’m planning on working on mine this weekend, I’ll definitely post pictures 🙂
Cheers,
Rodrigo
LikeLike
Ahh! OK. The reason for that is the same reason that dog holes on a conventional bench are always at the front edge of the bench. The reason is so that you can plane narrow stock. If the dog holes are 9 inches deep in the bench and you want to plane a long piece that’s only two inches wide you’re going to have to lean 8 inches over the bench to use the plane – which seriously reduces the body mass you can apply to the plane and will rapidly wear out your arms. Having the dog holes as close to the person as possible helps keep your weight over the workpiece and allows you to use your whole body in the planing process rather than just your arms.So, on the Milkman’s Workbench the dog holes are as close to the user as possible given the design of the bench.
Cheers,Mark
LikeLike
Ah, I see!
Brilliant, thank you very much once again 🙂
LikeLike
Hi Mark,
Thanks for posting this, a most insightful series of posts. I’m curious where you obtained you wonderful looking black hardware from for this project? Being left handed I’m very keen to put together something similar to this and getting the right hardware would be a great bonus.
RegardsSteve
LikeLike
Thanks Steve,The black hardware is just regular zinc coated hardware from the store with a little treatment. The hold-down tabs are just short sections of angle iron.To make the hardware black I first soaked the screws in a little bit of citric acid (you can buy the powder on eBay) which removes the zinc and lacquer and takes the screw down to bare metal (as well as removing rust). Then I took all the hardware and treated it with Super Blue which you can buy at any of the big box hunting suppliers. The Super Blue reacts with the steel and creates a black oxide film on the surface of the metal. I like it too. The key is to make sure you use a strong g enough citric acid solution to remove the zinc. You’ll know it’s finished when the bubbles stop.
-Mark
LikeLike
hello, I was just wandering if you could put up a cutting list for the parts. Really exited about making one of these a really interesting idea thank you. Also would the vice threads be ok if the were made 1inch diameter thanks james
LikeLike
Hi James,The entire parts list is included in the Popular Woodworking article I referenced in my blog post. That is not mine to reproduce, sorry. It is, however, available to purchase on their website if you are interested. Here is alink to the digital download, it’s $5.99: http://www.shopwoodworking.com/popular-woodworking-magazine-jun-2013-digital-donwload-u6958?=pwtnarticleindexAs for the vise screws, I think 1" screws would be pretty weak. Given the depth of the threads there wouldn’t be much wood left in the shaft of the screw to handle the force. Would it work? Probably. I’m just not sure how durable it would be. Do you already have a 1" tap & die set? Is that why you want to use that size?
LikeLike
thanks for replying so fast. I don’t already have a tap & die set but the place i found hand threading sets doesn’t sell the a 1 1/4" set only 1" or 1 1/2". I live in the UK so it’s hard to source some types of tools. There are only limited retailers. Would you recommend doing the screws with 1 and 1/2 inch diameter instead. Also i was wandering if the circular blank could be made by hand without a lathe. Or if you know anywhere in the Uk which sells the right sized rods. Thanks James
LikeLike
sorry i forget to ask. Would beech be ok to use?Thank you
LikeLike
A great project, I also want to make an oak coffee table. Your article gave me a lot of experience
LikeLike
That’s such a lovely workbench. The thing is you have cut and made every thing so accurate and you have all the work so perfectly. It’s wonderful. Thanks for sharing the tips for a perfect work bench.
LikeLike
The photographs of your workshop show that you have a number of handy and electric tools. This introduction of the tools is also very interesting. You are doing your job very well .
LikeLike